These are the concepts you should know in React.js
These are the concepts you should know in React.js
These are the concepts you should know in React.js

Photo by Daniel Jensen on Unsplash
For Learning the basic tutorials you cna follow my playlists on React JS
{%youtube PJuNmlE74BQ %}
By far the most important concept on this list is understanding the component lifecycle. The component lifecycle is exactly what it sounds like: it details the life of a component. Like us, components are born, do some things during their time here on earth, and then they die ☹️
But unlike us, the life stages of a component are a little different. Here’s what it looks like:
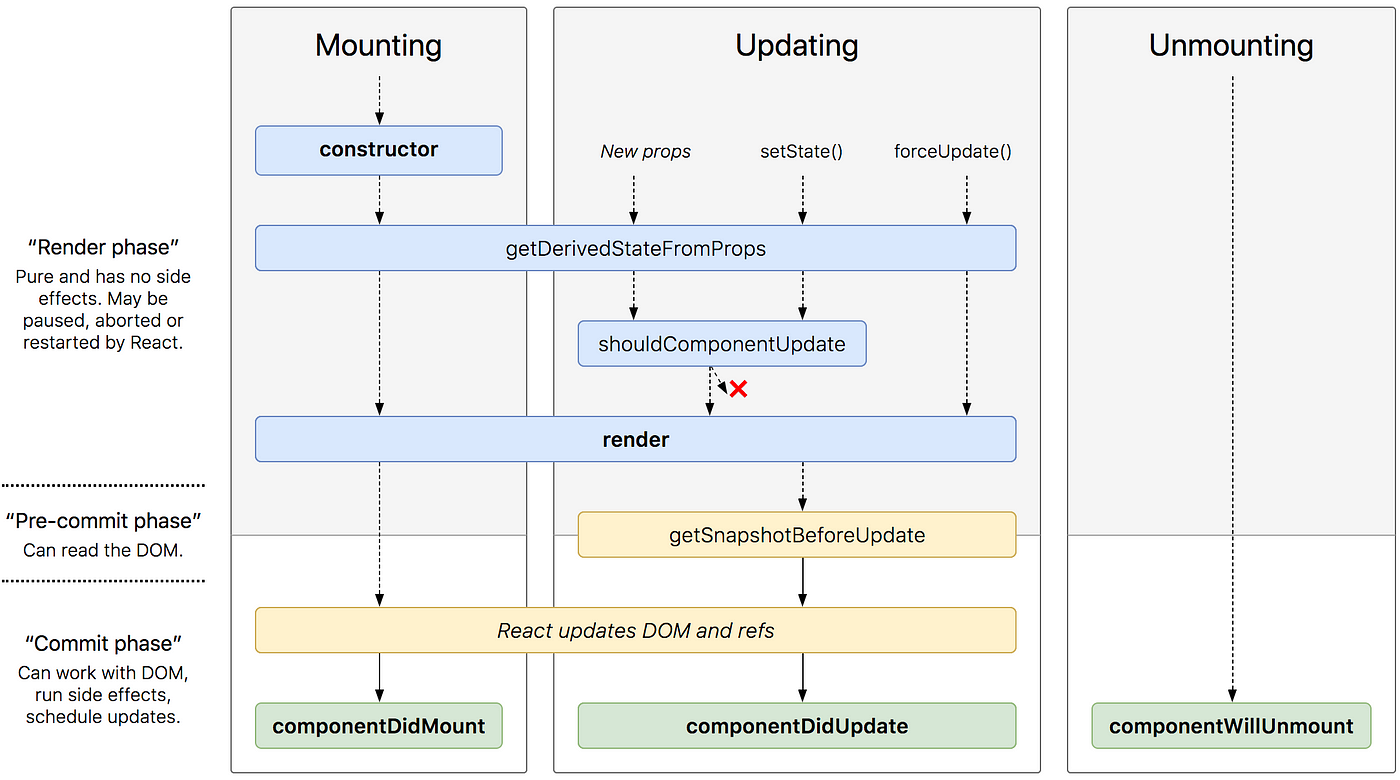
Image from here!
Let’s break this image down. Each colored horizontal rectangle represents a lifecycle method (except for “React updates DOM and refs”). The columns represent different stages in the components life.
A component can only be in one stage at a time. It starts with mounting and moves onto updating. It stays updating perpetually until it gets removed from the virtual DOM. Then it goes into the unmounting phase and gets removed from the DOM.
The lifecycle methods allow us to run code at specific points in the component’s life or in response to changes in the component’s life.
Let’s go through each stage of the component and the associated methods.
Mounting
Since class-based components are classes, hence the name, the first method that runs is the constructor method. Typically, the constructor is where you would initialize component state.
Next, the component runs the getDerivedStateFromProps. I’m going to skip this method since it has limited use.
Now we come to the render method which returns your JSX. Now React “mounts” onto the DOM.
Lastly, the componentDidMount method runs. Here is where you would do any asynchronous calls to databases or directly manipulate the DOM if you need. Just like that, our component is born.
Updating
This phase is triggered every time state or props change. Like in mounting, getDerivedStateFromProps is called (but no constructor this time!).
Next shouldComponentUpdate runs. Here you can compare old props/state with the new set of props/state. You can determine if your component should re-render or not by returning true or false. This can make your web app more efficient by cutting down on extra re-renders. If shouldComponentUpdate returns false, this update cycle ends.
If not, React re-renders and getSnapshotBeforeUpdate runs afterwards. This method has limited use as well. React then runs componentDidUpdate. Like componentDidMount you can use it to make any async calls or manipulate the DOM.
Unmounting
Our component lived a good life, but all good things must come to an end. The unmounting phase is that last stage of the component lifecycle. When you remove a component from the DOM, React runs componentWillUnmount right before it gets removed. You should use this method to clean up any open connections such as WebSockets or intervals.
Other Lifecycle Methods
Before we move onto the next topic, let’s briefly talk about forceUpdate and getDerivedStateFromError.
forceUpdate is a method that directly causes a re-render. While there may be a few use cases for it, it should typically be avoided.
getDerivedStateFromError on the other hand is a lifecycle method that isn’t directly part of the component lifecycle. In the event of an error in a component, getDerivedStateFromError runs and you can update state to reflect that an error occurred. Use this method copiously.
The following CodePen snippet shows the steps in the mounting phase:
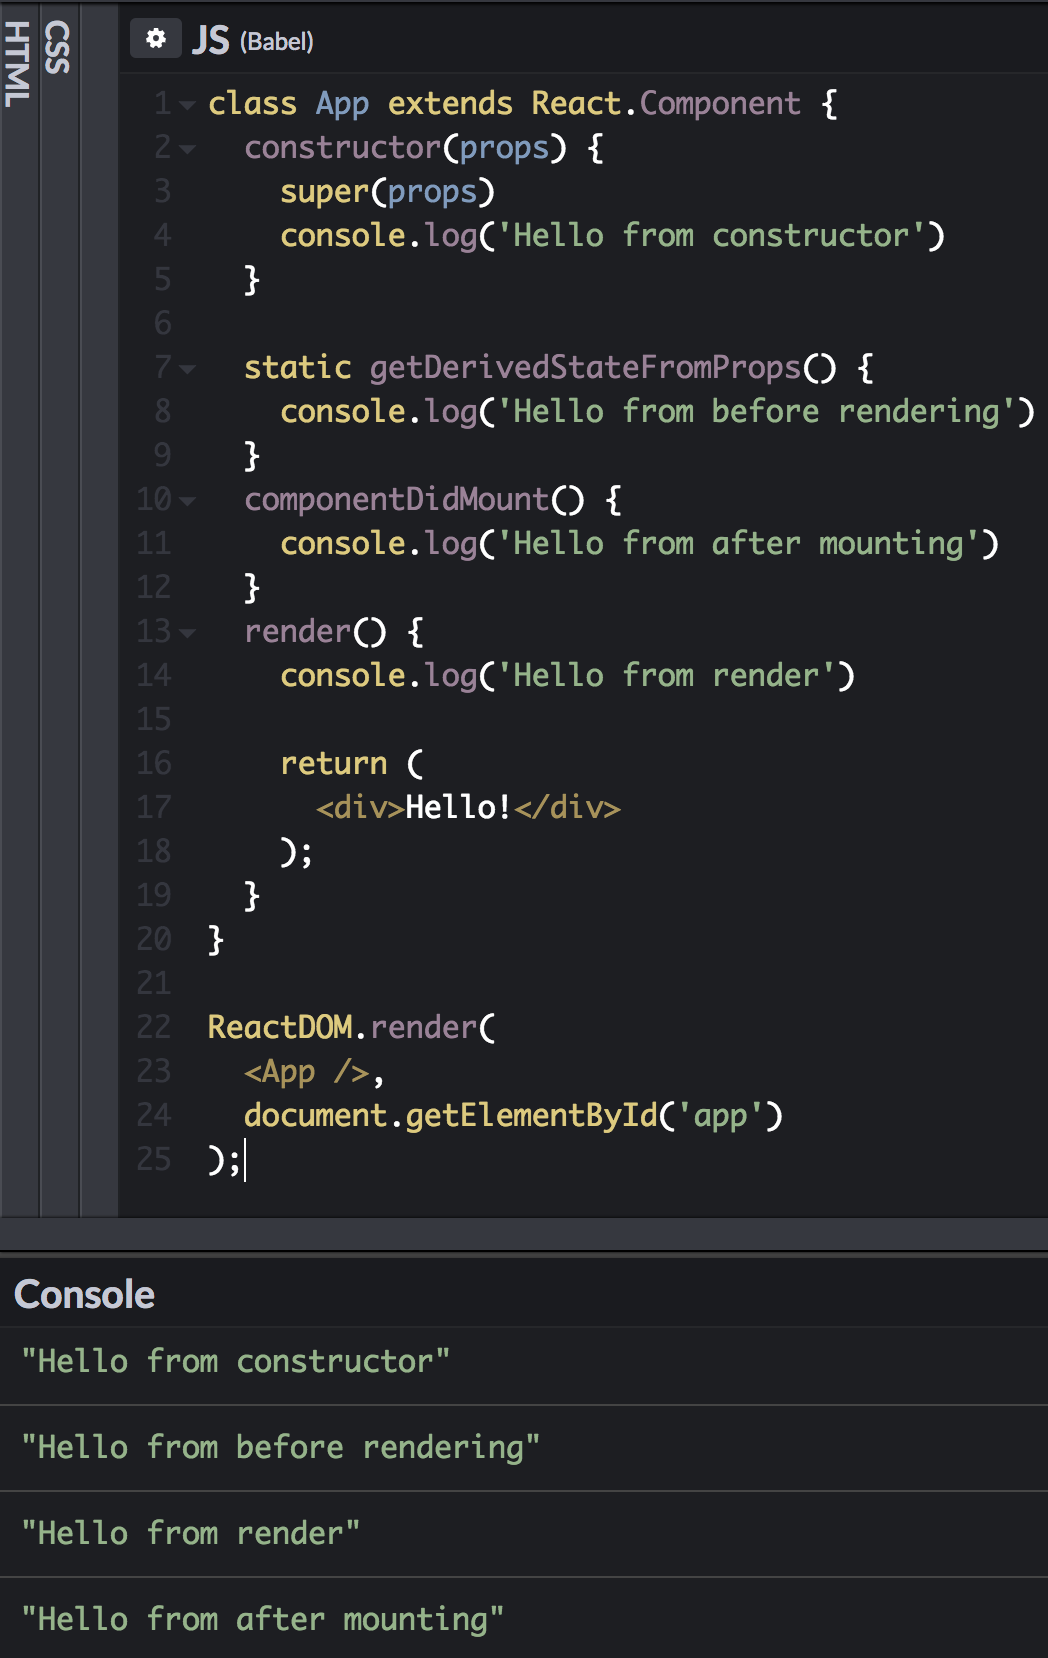
Mounting lifecycle methods in order
Understanding React’s component lifecycle and methods will allow you to maintain proper data flow and handle events in your application.
2. Higher-Order Components
You may have used higher-order components, or HOCs, already. React-Redux’s connect function, for example, is a function that returns a HOC. But what exactly is a HOC?
From the React docs:
A higher-order component is a function that takes a component and returns a new component.
Going back to React-Redux’s connect function, we can look at the following code snippet:
const hoc = connect(state => state)
const WrappedComponent = hoc(SomeComponent)
When we call connect, we get a HOC back that we can use to wrap a component. From here we just pass our component to the HOC and start using the component our HOC returns.
What HOCs allow us to do is abstract shared logic between components into a single overarching component.
A good use case for an HOC is authorization. You could write your authentication code in every single component that needs it. It would quickly and unnecessarily bloat your code.
Let’s look at how you might do auth for components without HOCs:
Lot’s of repeated code and messy logic!
Using HOCs, you might do something like so:
Easy HOCs
Here’s a working CodePen snippet for the above code.
Looking at the above code, you can see we are able to keep our regular components very simple and “dumb” while still providing authentication for them. The AuthWrapper component lifts all authentication logic into a unifying component. All it does is take a prop called isLoggedIn and returns the WrappedComponent or a paragraph tag based on whether or not that prop is true or false.
As you can see, HOCs are extremely useful because they let us reuse code and remove bloat. We’ll get more practice with these soon!
3. React State and setState()
Most of you have probably used React state, we even used it in our HOC example. But it’s important to understand that when there’s a state change, React will trigger a re-render on that component (unless you specify in shouldComponentUpdate to say otherwise).
Now let’s talk about how we change state. The only way you should change state is via the setState method. This method takes an object and merges it into the current state. On top of this, there are a few things you should also know about it.
First, setState is asynchronous. This means state won’t update exactly after you call setState and this can lead to some aggravating behavior which we will hopefully now be able to avoid!
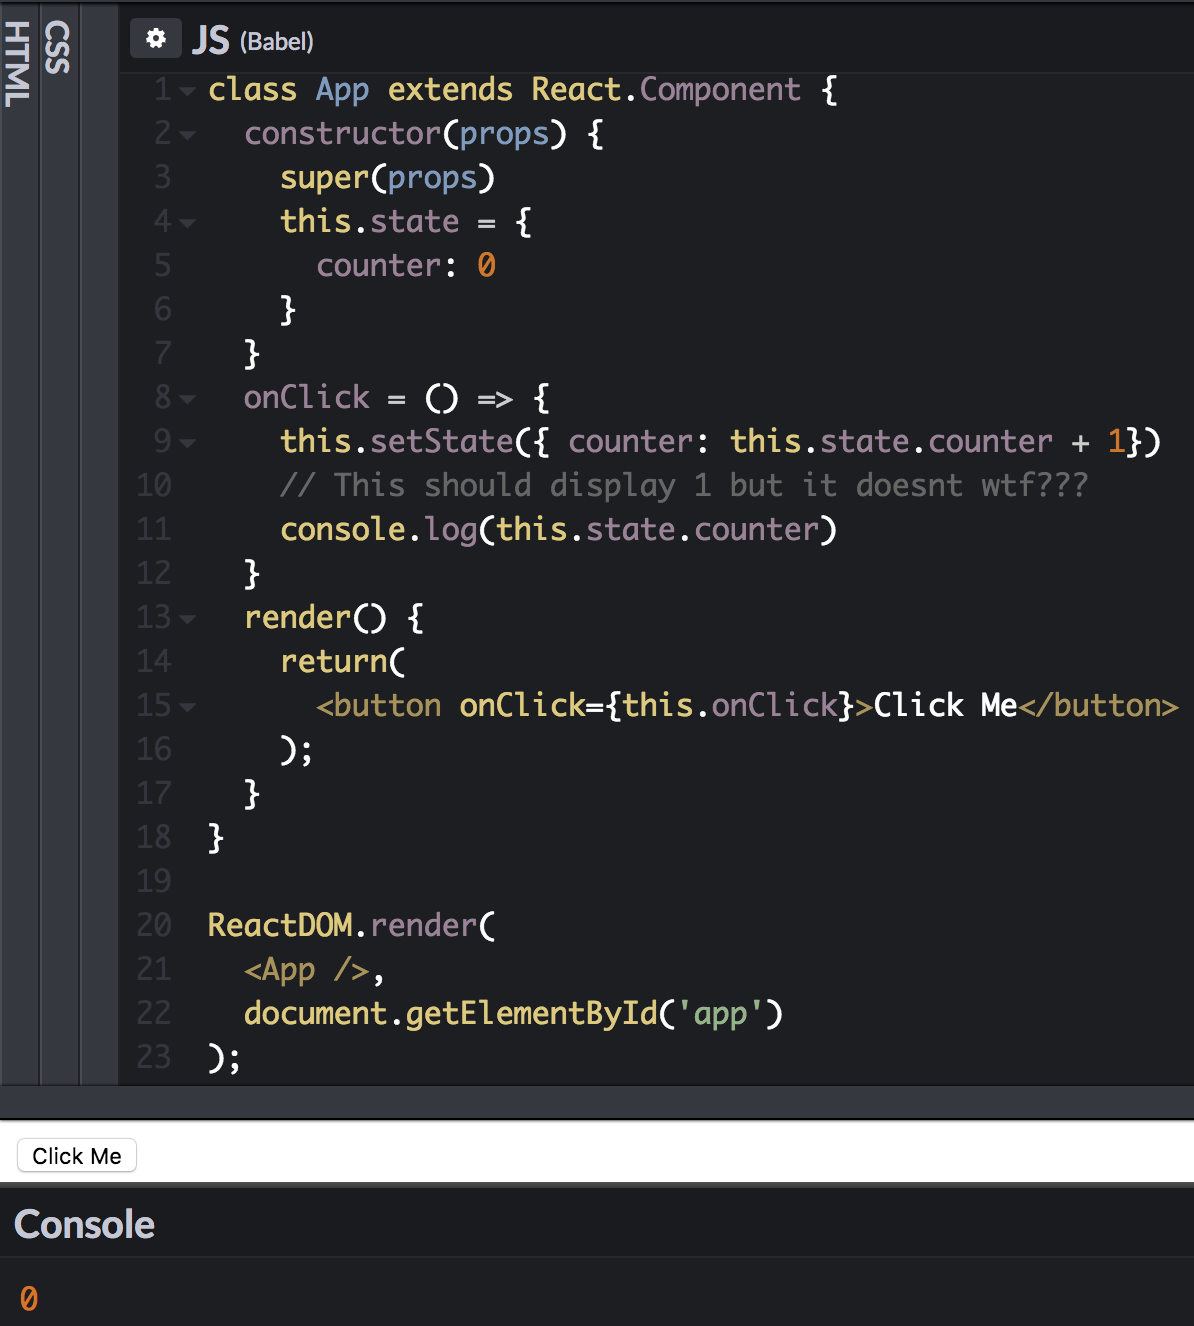
setState asynchronous behavior
Looking at the above image, you can see that we call setState and then console.log state right after. Our new counter variable should be 1, but it’s in fact 0. So what if we want to access the new state after setState actually updates state?
This brings us to the next piece of knowledge that we should know about setState and that is it can take a callback function. Let’s fix our code!
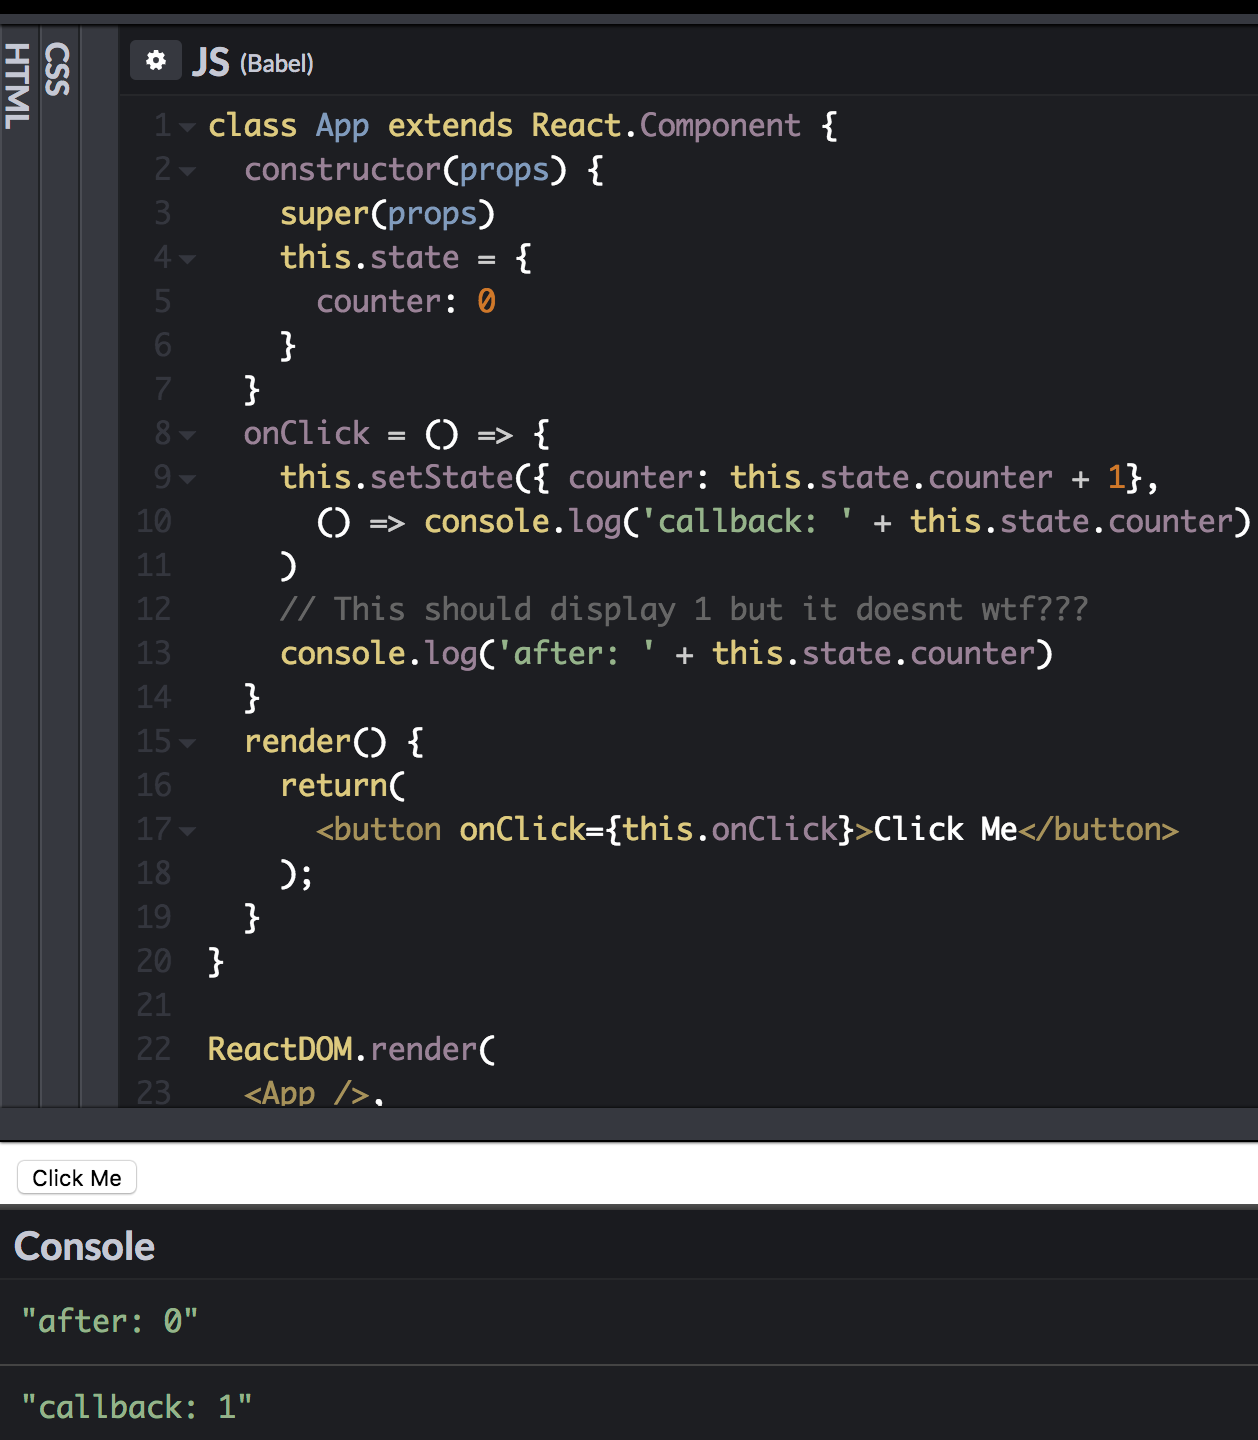
It works!
Great, it works, now we’re done right? Not exactly. We’re actually not using setState correctly in this case. Instead of passing an object to setState, we’re going to give it a function. This pattern is typically used when you’re using the current state to set the new state, like in our example above. If you’re not doing that, feel free to keep passing an object to setState. Let’s update our code again!

Now we’re talking.
Here’s the CodePen for the above setState code.
What’s the point of passing a function instead of an object? Because setState is asynchronous, relying on it to create our new value will have some pitfalls. For example, by the time setState runs, another setState could have mutated state. Passing setState a function gives us two benefits. The first is it allows us to take a static copy of our state that will never change on its own. The second is that it will queue the setState calls so they run in order.
Just take a look at the following example where we try to increment the counter by 2 using two consecutive setState calls:
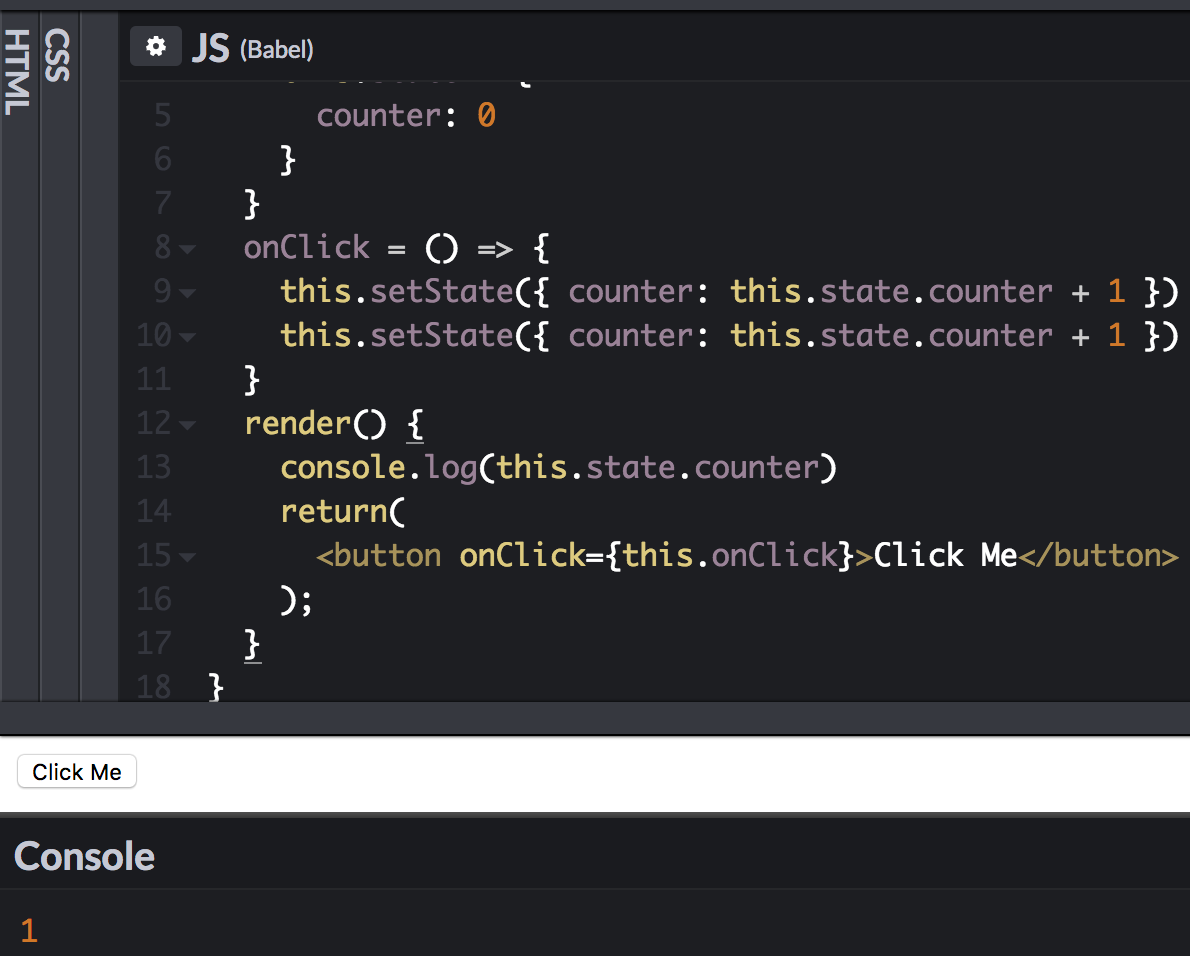
Typical async behavior from earlier
The above is what we saw earlier while we have the fix below.
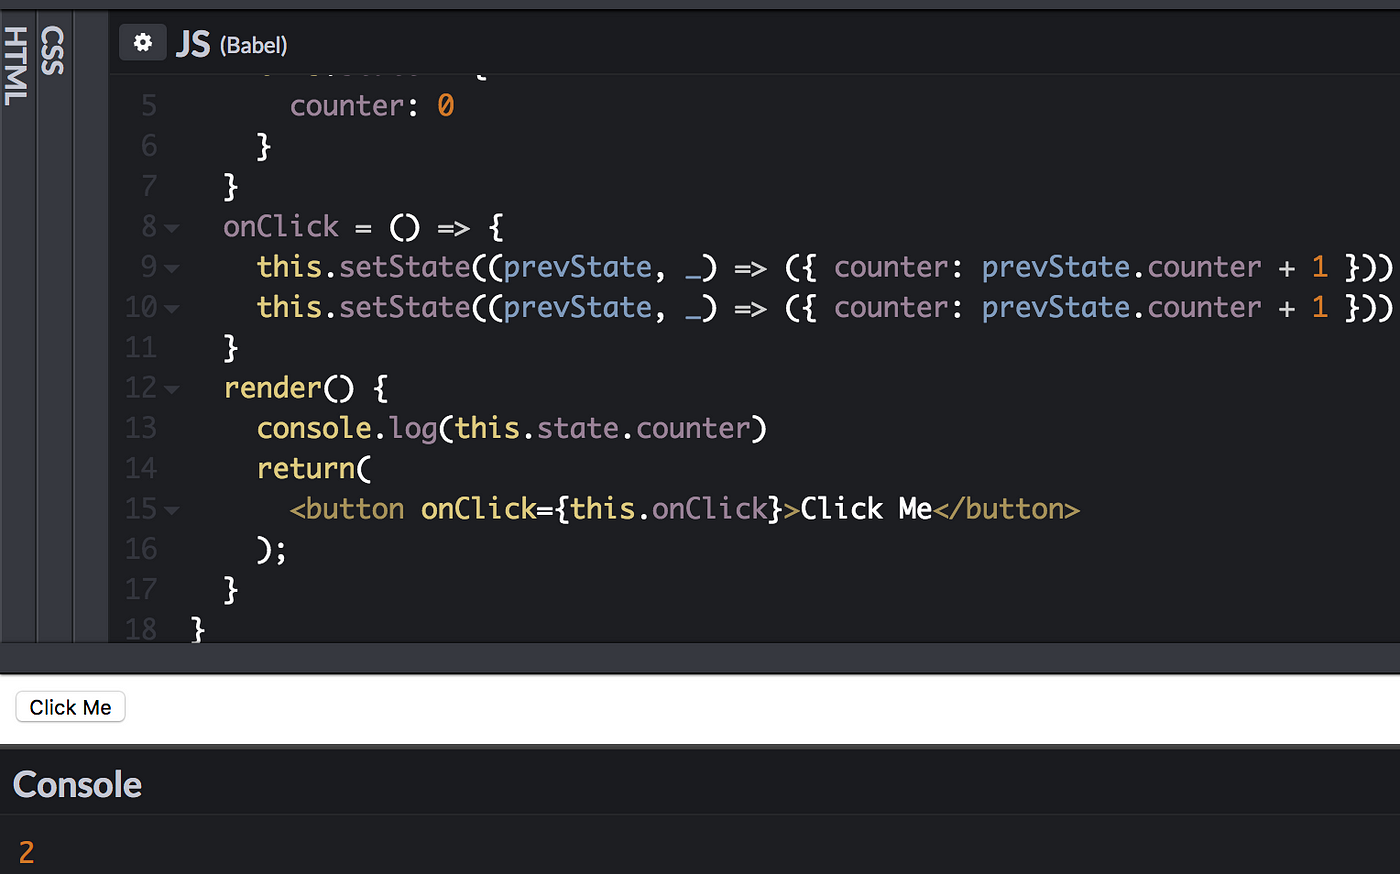
The fix to get our expected behavior
CodePen for above code.
In the first picture, both setState functions directly use this.state.counter and as we learned earlier, this.state.counter will still be zero after the first setState is called. Thus, we get 1 instead of 2 because both setState functions are setting counter to 1.
In the second picture, we pass setState a function which will guarantee both setState functions run in order. On top of this, it takes a snapshot of state, rather than using the current, un-updated state. Now we get our expected result of 2.
And that’s all you need to know about React state!
4. React Context
This brings us now to React context which is just global state for components.
The React context API allows you to create global context objects that can be given to any component you make. This allows you to share data without having to pass props down all the way through the DOM tree.
So how do we use context?
First create a context object:
const ContextObject = React.createContext({ foo: "bar" })
The React docs describe setting context in a component like so:
MyClass.contextType = MyContext;
However, in CodePen (React 16.4.2), this did not work. Instead, we’re going to use an HOC to consume context in a similar manner to what Dan Abramov recommends.
What we are doing is wrapping our component with the Context.Consumer component and passing in context as a prop.
Now we can write something like the following:
And we’ll have access to foo from our context object in props.
How do we change context you might ask. Unfortunately, it’s a little more complicated but we can use an HOC again and it might look like this:
Let’s step through this. First, we take the initial context state, the object we passed to React.createContext() and set it as our wrapper component’s state. next we define any methods we’re going to use to change our state. Lastly, we wrap our component in the Context.Provider component. We pass in our state and function to the value prop. Now any children will get these in context when wrapped with the Context.Consumer component.
Putting everything together (HOCs omitted for brevity):
Now our child component has access to global context. It has the ability to change the foo attribute in state to baz.
Here’s a link to the full CodePen for the context code.
5. Stay up to date with React!
This last concept is probably the easiest to understand. It’s simply keeping up with the latest releases of React. React has made some serious changes lately and it’s only going to continue to grow and develop.
For example, in React 16.3, certain lifecycle methods were deprecated, in React 16.6 we now get async components, and in 16.7 we get hooks which aim to replace class components entirely.
Conclusion
Thanks for reading! I hope you enjoyed and learned a lot about React. While I hope you did learn a lot just from reading, I encourage you to try out all of these features/quirks for yourself. Reading is one thing, but the only way to master it is to do it yourself!
Lastly, just keep coding. Learning a new technology may seem daunting but the next thing you know, you’ll be a React expert.
If you have any comments, questions, or think I missed something, feel free to leave them below.


Comments